
To my ardent fans and supporters:
The Feather Forge will no longer be updated here. Please go to the new site for your fix.
I know, it lacks some of the style of the old place, but it will get better! Truly!
Monday, February 1, 2010
Thursday, January 21, 2010
Arisia costume 2010: False eyelashes are stabby, and other lessons learned
So the costume ended up being "the Borg tried to assimilate Faery" and was made up of green prom dress + Borg torso and arm pieces + green shirt (for the non-Borg arm/shoulder + feather ears + long green false eyelashes. And some sparkly things in my hair. Also: gold lipstick on Saturday (silver on Sunday, which I liked much less).
Lessons:
1) If you do not get the inner ends of the false eyelashes stuck down really, really well, they will curl up and stab your upper eyelids every. time. you. blink. And sometimes when you aren't blinking. Two days after, I found I had flaky skin on my upper eyelids - scabs, apparently, from the repeated stabbings, which happened because I put the eyelash glue in the bag that I put in the coat check and thus didn't want to try to retrieve.
2) Carry the damn eyelash glue WITH YOU.
3) Strands of beads hanging in your hair are heavy and will pull the hairclips to which they are attached down towards the floor. This hurts. Also hurting? When hair gets wrapped around the beads in stupid ways.
4) The wire hooks on the ears were a little too tight on the first day. And needed adjusting to a more comfortable position much sooner than the end of the day.
5) Wearing a turtleneck + dress + cardboard and leather thing over your chest makes for some overheating. That Borg element needs some sort of ventilation. Pushing up my sleeves did help a lot; also, I could have not worn pants, because hello, wearing a dress. Which completely covered the pants AND the really long socks. (could have worn short socks, too, instead of the really long, almost tights, socks that I went with)
6) The flashy eyelashes were really quite popular. I think I got about as many compliments on them as on the feather ears or the overall look. (I thought they looked really weird.) And other than the STAB STAB STABBING, they were pretty comfortable.
I was complimented by one woman on how "subtle" the look was.
"Subtle?!" They were BRIGHT GREEN! And enormously long! YOU COULD NOT MISS THEM!!!
"Well, yes," she said, "Compared to putting on a whole bunch of make up."
Hmm, well, okay.
And some awesome things:
The layers kept me warm in rooms that I would have normally been freezing in.
Got to show off the construction of the ears to several people, including a couple of people who I sent the Flickr link to because they seemed particularly interested in it.
Noticed by the hall costume awards people. Twice, even! I was found late on Sunday by one of the people doing hall awards, who wanted to make sure I got one (which I already had earlier that day).
Person at a party who blurted out, "I'm sorry, I can't stop staring at you, but you're just so pretty!" (She was one of the people I sent a link to later.) I know that dress looks good on me, but the eyelashes were just so weird.
Sunday, January 10, 2010
It must be nearly Arisia
How do I know? Because suddenly I feel like I must spend every available minute working on a costume, because I put off working on it until um about a week ago (granted, I didn't have a good idea until about TWO weeks ago).
Anyway.
(I am feeling lazy and will therefore not be putting images right in the post. Maybe later.)
It involves feathered ear things, because it's been way too long since I made anything with feathers, and at this point I have enough feathers to build an entire flock of over-energetic birds, so I need to do something useful with them. (More birds == bad idea. Two is quite enough, especially when they decide to get a look at what I am doing. A really, really close look. And then get cranky and territorial and possessive about the thing in your hand that they want to chew on and carry away.)
One of the things on my mental to do list was to work out interesting wire ear cuffs, and finally, last month, I did just that! And the results are pretty neat, though I need to make myself another of the spiffy moonstone ones, because the first one went to someone as a gift.
The basic structure works out very well to support much more elaborate structures than mere beads. Not that feathers are such a weighty structure; the feather ear things are very light (SHOCKING I KNOW) and pretty comfortable.
Tuesday, April 14, 2009
Prototype nautilus
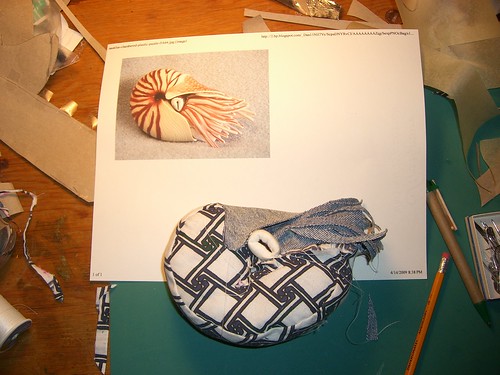
About 3 hours of work to get to this point. I sewed my finger to it once, and then almost did a second time (hand sewing, and the needle/thread only passed through the uppermost layer of skin, but it felt rather weird).
First time posting using Flickr's "blog this" option; let's see how it works.
ETA: Hmm, well that's rather convenient for posts containing just one picture. Except I still have to add tags via Blogger's editor.
Sunday, April 12, 2009
It's interesting, but what is it good for?

This project was actually completed a few years ago, as the final project in my Experimental Drawing class. I combined techniques from our puzzle project and our juxaposition project, primarily because I wanted to see how easy it would be to make a tessellating pattern that could also interlock in 3D. (The image above is actually of some of the test pieces, not the final set, but you get the idea.)
I was also interested in exploring what would happen when I scrambled an image (traced onto the acrylic pieces), overlaid some bits of it with other bits, and then linked sets of pieces together to form partial cubes. Since all the pieces are the same shape, the partial cubes can be stacked, made into rows, etc., so you get some depth to the recombined image.
It wasn't as successful as I had hoped (not that I really had any clear idea what it would be like), and I've often wished I still had access to a laser cutter, so that I could do more experimenting. I think it would be much more interesting if I had used much thicker lines on the acrylic, and chosen a pattern that would align better, so that the lines from the original image could link up with other lines that came from a different part of the image, creating an interesting new, fragmented/reassembled picture. It would certainly be easier with a pattern, rather than a picture.
If the pieces were larger - 12 inches on a side, or 2 feet - I could see them being used for shelving or end tables, although I'd want to make them from wood (probably), and work out a good way to keep the pieces together, because they slide apart /really/ easily, and that's a Bad Thing for furniture. (I could just cut the slots slightly smaller, but then they might bind, especially if they were wood.)
Because Easter has the best candy
I figured I could justify buying some for myself if I also bought some for other people. And then I thought it would be more fun to actually make up little Easter baskets to put it in. But of course I didn't want to buy some small, cheap basket that wouldn't be worth the dollar-fifty, so I had to come up with another solution.
I could fold basket shapes out of newspaper.
Or . . . I could make use of the empty kleenex boxes that are almost always around (the household goes through a LOT of kleenex. Sorry - Kleenex).
Oh! And I could cut the edges down into grass shapes! And trim around the flowers printed on the sides!
So I did, and apparently they were a hit. One of the recipients encouraged me - repeatedly; one could say he egged me on, if one were inclined to make that sort of pun, which I am not, you're welcome - to write it up as an Instructable, no really, he thought it was quite clever, and it could be just one photo and a couple lines of text, how quick and easy would that be!
Well. See for yourself.
Make an Easter basket from materials found in the recycle bin - More DIY How To Projects
I am actually quite pleased with them myself, but it -is- more than one step! My only regret? That I didn't buy more chocolate eggs. But by some strange coincidence, tomorrow is the day after Easter, so there should be some good sales. And since I've been planning to hit post-Easter sales for cheap moving toys (glee! I can make Porkchop a friend!), well, I might as well take a minor side trip to the candy aisle.
Thursday, March 5, 2009
(Part of the reason) Why I don't do electronics
I like mechanical systems better than electrical or electronic systems. I trust them more. Do you know why? It's like this:
In the winter, when the air is dry and you build up a static charge walking around, and you walk over to the metal sink to empty out the dregs of your tea, and the liquid pours out of the cup and strikes the sink, that harmless looking metal spoon - which is still in the cup, and which you are holding onto with one finger - will deliver a surprising and painful shock which has traveled to you from the sink UP THE COLD TEA.
Electricity may be useful, but it is a jerk.
Tuesday, February 17, 2009
Picture hangers - the exciting anticlimax!
Or perhaps the actual climax, as everything after this is just repeating what's been done already, only better.
It works! The prototype works!!!
See?
Hanger on a shelf, under some magazines:

Hanger being used; cute picture of birds covering boring magazines:

The prototype all by its lonesome:

I used the small sheet metal brake to do the bending; it worked wonderfully. Very fast, very easy; I was done before the other folks around me had any idea I'd done anything at all (okay, they were in another room, they couldn't see me, but I was wandering around flipping through books for several minutes before they realized I was done with the hanger).
So. The concept works. It needs a little bit of refinement: more length along the longest unbent section; it only just barely fit over the shelf. It could also use a little more room in the vertical section of the over-the-shelf hook on the back; I don't want to end up messing up the shelf by scraping the shelf up. And I need to get the bend at the very end closer to parallel, so that pictures will hang level.
It works! The prototype works!!!
See?
Hanger on a shelf, under some magazines:
Hanger being used; cute picture of birds covering boring magazines:
The prototype all by its lonesome:
I used the small sheet metal brake to do the bending; it worked wonderfully. Very fast, very easy; I was done before the other folks around me had any idea I'd done anything at all (okay, they were in another room, they couldn't see me, but I was wandering around flipping through books for several minutes before they realized I was done with the hanger).
So. The concept works. It needs a little bit of refinement: more length along the longest unbent section; it only just barely fit over the shelf. It could also use a little more room in the vertical section of the over-the-shelf hook on the back; I don't want to end up messing up the shelf by scraping the shelf up. And I need to get the bend at the very end closer to parallel, so that pictures will hang level.
Picture hangers - some actual progress!
Remember the picture hangers? Which, as it turns out, could not be easily cut out of dead fluorescent fixtures without some considerable difficulty?
Well, I finally hauled a small pile of dead fluorescent bodies to the metal shop and asked the monitor in charge if there -was- a way to turn that scrap into useful strips, or whether I should just go find some nice flat metal, maybe even already in narrow strips.
First he thought the metal chop saw might be the right approach. Then reconsidered and tried the metal bandsaw, which was quite impressive, but the fixture was way to light (and squashable) to easily be clamped down -and- sawed. It got partially cut, and then was pulled free of the clamp by the saw in a not very spectactular but still kind of alarming fashion.
So he just cut off the end of the fixture with tin snips, and suggested using a jigsaw to cut the strips out. After flattening the fixture out a bit, we (well, mostly he) set up some scrap wood to clamp the metal to, and I took the jigsaw to it. (Dangit, I should have photographed that setup. Next time . . . )
It worked great! For future, though, I want to cut the strip in one pass, rather than two, because I couldn't get the two cuts to line up, which left a jagged edge that took too much grinding to get even.
Still, for a first try, it worked very well. Jigsaw. Who knew! (It's all in the blade you choose. This should have been obvious to me.)
I got the strip cut to size, and one end cut and rounded off (this will be the hook that the picture hangs from), and used a belt sander to remove all the rough bits from the raw edges. It is nearly done!

I think tonight I will see about bending the strip into the right shape, using the very small metal brake (or perhaps a vise and pliers).
Well, I finally hauled a small pile of dead fluorescent bodies to the metal shop and asked the monitor in charge if there -was- a way to turn that scrap into useful strips, or whether I should just go find some nice flat metal, maybe even already in narrow strips.
First he thought the metal chop saw might be the right approach. Then reconsidered and tried the metal bandsaw, which was quite impressive, but the fixture was way to light (and squashable) to easily be clamped down -and- sawed. It got partially cut, and then was pulled free of the clamp by the saw in a not very spectactular but still kind of alarming fashion.
So he just cut off the end of the fixture with tin snips, and suggested using a jigsaw to cut the strips out. After flattening the fixture out a bit, we (well, mostly he) set up some scrap wood to clamp the metal to, and I took the jigsaw to it. (Dangit, I should have photographed that setup. Next time . . . )
It worked great! For future, though, I want to cut the strip in one pass, rather than two, because I couldn't get the two cuts to line up, which left a jagged edge that took too much grinding to get even.
Still, for a first try, it worked very well. Jigsaw. Who knew! (It's all in the blade you choose. This should have been obvious to me.)
I got the strip cut to size, and one end cut and rounded off (this will be the hook that the picture hangs from), and used a belt sander to remove all the rough bits from the raw edges. It is nearly done!
I think tonight I will see about bending the strip into the right shape, using the very small metal brake (or perhaps a vise and pliers).
Monday, February 16, 2009
Belated post-mortem on the Borg pirate
I really should have written this up right away after Arisia, so that I would have good notes on What Not to Do for a future iteration of the costume. Assuming there will be another. Which there might. Or at least there might be a future prosthetic arm, perhaps in a steampunk style rather than Borg.
So.
Cables: A cable that runs from the forearm all the way to the chest is Not Good. It meant I had to take off the upper arm piece, and disconnect the cable from the battery pack, in order to remove the forearm. Having a cable that can plug in at either the battery OR the forearm would be much better. I think having the cable attached to the upper arm, and then running from that in both directions, would work much better. (Or, put the power source for the arm activator -in- the arm, and reduce the number of cables. Though in this case, more cables was good, because Borg have lots of cables dripping off them.)
Arm activator: The pager motor worked fairly well for something thrown together in the last couple nights. But something that did something more interesting than spinning around and going VVVRRRRRR! would be nice. Something that moved in a grabby sort of manner, perhaps?
Weight: The leg was heavy. Actually, it was the foot that was heavy. The Borg foot (which just fit right over a normal boot, like an immense spat) was heavy and made walking difficult. For the future, making a foot/lower leg assembly out of paper mache, and then covering that with leather, would be better than chopping up a heavy pair of rubber boots and sticking them together with duct tape.
Leg awkwardness: The upper and lower parts of the leg armor got hung up on each other at times and made walking a bit tricky. And stairs VERY tricky (esp. with the big, heavy foot). Adding some hinge-looking bits to the outer knee would have been a nice touch aesthetically. The cable ends came loose a number of times, too.
Cable attachments: Cables were firmly fixed at one end with duct tape (or Gorilla tape), but shoved into a loop of tape/leather at the other. Some of the cable ends stayed in place pretty well with that arrangement, but a lot of the leg cables pulled out of their tape/leather end. Should look for some sort of easy-release clip or something. Perhaps some sort of clip that is designed for cables/tubing - which could be hidden inside a leather shell so that it doesn't look like audio cable, but like it penetrates into my body. The cable that I wanted to run from my head to my torso didn't work at all because I didn't have a good way to keep the body end of it from pulling free.
More fiddly bits: Could have done with more LEDs and mechanical pieces. Matter of time, by which I mean I should have started more like 6 weeks, minimum, in advance instead of 4. Tritium keyring things would be a great way to get a nice glow without having to worry about a power source.
Eye prosthesis: It looked great, was pretty comfortable, and the visibility wasn't terrible (though I really missed having peripheral vision on that side!). However, it would have been great fun if I'd had it hooked up to the shutter thingy. I need a longer remote shutter release for that, and a good way to connect that cable to the headpiece and the rest of the body armor, so that it will stay in place, and not be too likely to get hung up on things in the environment. Perhaps adding some LEDs to that (which I could turn on and off - don't want them on ALL the time, thank you), or an other layer of lenses or something that could be rotated into place from time to time . . . So many possibly variations and so little time!
The pirate bits worked pretty well. The kerchief was unbelievably slippery and I had to clip it to my hair, and the shredded shoulder made it a real pain to get Frankie attached to my shoulder cables, but since I probably won't redo the pirate part (or even the pirate Borg combo), that's not something I'm much worried about.
People pretty well "got" the pirate aspect of the costume. I think. I heard several comments like, "Oh, there's someone doing that steampunk/cyberpunk combo" or just plain "steampunk;" about as many people understood that I was (partially) a Borg as did NOT understand, but whether that was due to lack of familiarity on their part with Star Trek, or due to my failure to make something that was obviously Borg, I do not know. I got a lot of compliments, it was fun to make and fun too wear, and not too terribly tiring (though a day and a half was a bit long, see:weight issues), and really that was the point.
I need to get a bunch of photos of the pieces, since I didn't document the process well (too busy building to stop and photograph), after which this will all make more sense to people who are not me.
Subscribe to:
Posts (Atom)


